What’s On Your Website?

When I first started teaching, I didn’t have a website and I’m guessing many of my colleagues didn’t either.  Since then, I’ve built a handful for my various jobs and roles.  In my current role, one part of my job is supporting teachers as they create their own websites.  I get the same question a lot: what should be included in a teacher’s website?

The problem is, there is no one-size-fits-all answer.  Every teacher’s classroom is different, so every teacher’s website is different.  That said, I have come to believe that there are a few basics that every teacher or classroom website should include as well as several “extras” you can add if you are interested in have time.

Before I jump into the “must haves” and “nice to haves,” there are a few other things I ask teachers to keep in mind regarding their website.  First, what do you need it to do?  What’s your purpose?  Are you simply communicating with parents? Will your students be accessing class materials on your site? Are you trying to advertise or promote your program?  All of the answers to these questions help determine what and how much needs to be on your site.

Second, how much time do you have to devote to updating your website?  Nothing is more annoying to me than going to a teacher’s website that’s horribly out of date.  If I’m still seeing pictures of Halloween in April, we have a problem.  I recommend keeping the bulk of the website static so it doesn’t need to be changed often.  You can incorporate something like a blog or Twitter feed to keep viewers up to date on what’s going on in your classroom.

Third, what other methods of communication do you already use?  This one particularly comes into play at the elementary level.  Many of my K-5 friends still compile and print a paper newsletter each week (and some do one for the month AND one for each week).  Then they also feel the need to update the exact same information on their website each week, resulting in them working twice as hard.  Consider uploading the digital copy of your paper newsletter so parents can see it there rather than retyping the information (or better yet, scrap the paper newsletter altogether!).

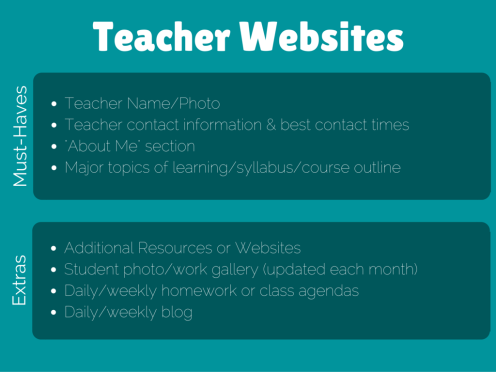
Okay, so what should you have on your site?  The most basic info is your name and photo.  Parents should be able to easily tell whose website they’re on and the photo confirms they’re in the right place (you’d be surprised how many parents know their child’s teacher by either name or face but not both, particularly parents with multiple children).

Next, include your contact information and how to best reach you.  This would likely include your email address and/or phone number.  It can also be helpful to let parents know the best times of day to reach you (if including your phone number) or when you check emails.  Even if you check messages more frequently, it’s helpful for parents to know that you will check at 8 am and 3 pm every day (for example).  It will keep them from wondering when you’ll get back to them.  One note: I never included my phone number on my website because I didn’t want parents calling during the day.  My first job is teaching their kids, which I can’t do when I’m tied up on the phone with one of their parents.

Tell a little bit about yourself.  You don’t need your entire life story, but families enjoy knowing a little bit about you and who you are as a person.  Maybe include a family photo or two.  Again, don’t share more than you’re comfortable with.  I also recommend to word your information in such a way that it doesn’t become out of date quickly.  For example, instead of saying I have a 2-year old son, I might say my son was born in 2014 or just skip his age/year altogether.

Finally, include information about your class.  At the secondary level, this is likely a syllabus or course outline.  For younger students, this might include a curriculum map or an outline of the majors units of study for that grade level.  You don’t need every single assignment or lesson here, just the big picture so parents have a rough idea of what’s coming.

Have some extra time?  I know, probably not, right?  Well, if you want to include a few more pieces of information, here are some of my “nice to have” extras you might think about including on your site.  Remember, some of these are only useful if you keep them updated regularly.  If you can’t commit time to do that, don’t include them!

  • Additional resources or websites for students to practice skills at home
  • Student photo gallery (should be updated at least once per month)
  • Student work examples (should be updated at least once per month)
  • Resources for students to use in class (handouts, assignments, links to websites, etc.)
  • Daily or weekly homework
  • Daily class agendas
  • Daily/weekly class blog

I’ve created a handy infographic to help you out:Teacher Websites
What else do you include on your website?

Ready for a Break

Ah, spring break!  It’s one of the things that students and teachers look forward to all year.  Except when you don’t have one.  Tomorrow is my spring break; I get a three-day weekend and it’s back at it on Monday.

Crazy, no?  Actually, this is not the first time I haven’t had a spring break.  My previous district apparently didn’t believe in them or something, so almost every year I worked there, we would get Friday and Monday around Easter as our “spring break.”  This year, new district, but because of construction deadlines, the school year is compressed a bit.  The plus side is that I’ll be done with school on May 27th (though that doesn’t make me feel better right now).

Because of the schedule, most teachers in my district only get two days off between New Year’s and Memorial Day (President’s Day and Good Friday).  Students have a few more days off, but those end up being teacher professional development or work days.  It makes for a long haul, particularly in Minnesota where we’re still waiting for the warmth of spring to fully kick in.  Kids are restless, teachers are tired, standardized tests are looming on the horizon…..all three combine to make school a bit chaotic.

Big deal, says everyone else in the “real world.”  Teachers get three months off, so why should they need breaks during the year?  Well, don’t you have vacation days?  In my jobs, I’ve only ever had (at most) 3 vacation days all year.  Now don’t get me wrong, “regular” jobs don’t have breaks built in like we do in schools (winter break, thanksgiving, MEA, etc.).  But people who work at “regular” jobs also don’t have to do all of their work in advance so somebody else can take their place.

Plus, we all need a break.  Americans are notorious for not taking time off.  Somewhere along the line, we adopted this culture that says taking time off is a bad thing, like it means we’re less committed to our work.  For me, even though I’m a bit of a workaholic, I love getting time away.  Whether I have big plans or none at all, I still need time away to recharge.

As I embark on my luxurious three day break, what will I be doing?  Not much.  Spending time with my family, and honestly, probably doing some work on the side.  Hoping for nice weather so we can enjoy some sunshine.  Who knows?  Maybe I’ll even write a blog post or two…

Happy Birthday, Twitter!

Though it seems hard to believe, Twitter is officially a decade old! Ten years ago today the first tweet was sent and the rest, as they say, is history. According to some quick Google searching, there are roughly 320 million people using Twitter as of 2016. Crazy, no?  Even crazier still, another site estimates that roughly 500 million tweets are sent EVERY DAY. Mind blowing!

For myself, I’ve technically had a Twitter account since 2008, but have only been actively using it for just over a year. In that time, I’ve added over 800 followers (most of which are educators) and followed over 900. I’ve made so many new edu-friends that I’d have lost count if it weren’t for that handy little counter on my profile. And the amount of knowledge I’ve gained in such a short time from the fabulous people? Immeasurable!

My second year of teaching (2007)

My second year of teaching (2007)

When I think back ten years ago, Twitter was just in its infancy and so was I. Not as a person, obviously, but as an educator. My teaching career turns ten this year as well. Back then, I was a brand new grad ready for my first job. I spent that first year as a middle school choir teacher, and let’s just say the experience was not exactly a highlight of my career.

Many things have changed since then. I escaped the middle school hormones and spent the next eight years teaching elementary music. I earned a master’s degree, another teaching license, and dozens of post-graduate credits. And now I’ve spent almost a year as a technology integration specialist.

If you had told 2006 me that that’s the path my career would take, I’m not sure I would have believed you.  So what, then, about the next ten years? As someone who wasn’t sure she’d make it to year ten, now we’re talking year twenty?!

I have no clue as to what the future holds. Will I still be in education? Still working with technology? I can’t even possibly imagine what technology could look like ten years from now, though I’m excited about the potential.

Or who knows? Maybe I’ll be off traveling the world on my yacht after my startup/book/blog/____ hits the big time…  😉

Guided Access on iPads

Have you ever used iPads with your students and caught them using a different app than what you asked them to use?  Frustrating, right?  Wouldn’t it be nice if you could keep them in the app you wanted in the first place?  Oh wait, you can!

The iPad has all kinds of tricks and hidden gems built in to make life easier for its users.  One of them is called Guided Access and what it does, among other things, is lock the iPad into a particular app.  It’s not exactly straightforward to find and turn on, but with a little digging, it can make classroom management with many iPads much simpler!

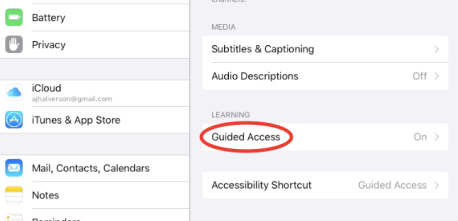
Guided Access is hidden in the accessibility settings.  To find it, follow these steps:

  1. Go to the Settings menu.
  2. From there, click General.
  3. Click Accessibility (there are actually several features here you might want to check out, but we’ll move ahead for now).

Screen Shot 2016-03-21 at 8.14.32 AM

4. Scroll down to Guided Access (near the bottom).

Screen Shot 2016-03-21 at 8.14.22 AM

5. Tap the switch to turn on Guided Access.

6. Then click Passcode settings.  (You will need to create a passcode if you don’t already have one.  This is what you will need to exit Guided Access when your students are done working.  Be sure you keep track of the passcode!)

You’re all set!  To activate Guided Access, enter the app you’d like students to use and then triple-click the home button.  The window will shrink a bit and you will see the Guided Access controls appear on the screen.  Click Start at the top right corner and Guided Access will be activated.

Screen Shot 2016-03-21 at 8.14.03 AM

Now when your students use the iPads and try to back out of an app, it won’t work.  They also can’t double-click the home button to scroll between open apps.  When you’re done using that app, triple-click the home button to reveal the Guided Access controls again.  From there, you can either end or resume Guided Access.  You can also use the Guided Access menu to turn off access to particular parts of the screen.  This can be helpful if their are buttons you don’t want your students to bump accidentally.  Remember, Guided Access has to be turned on each time you enter an app!

Beginning to Power Up – Prepping for a 1:1 Rollout

Many districts have made the move toward 1:1 device access for their students.  This can look different in every district; what devices are used, what ages of students are involved, whether students take devices home, and other variables make each 1:1 deployment unique.  Because of these differences, there really can’t be a “one size fits all” handbook when it comes to starting this type of program.  There are, however, books available now that try to provide some guidance and answers for teachers and districts as they navigate this new frontier.

Power Up: Making the Shift to 1:1 Teaching and Learning, written by Jen Roberts and Diana Neebe, does just that.  Both authors are teachers who have experience teaching with 1:1 access for their students.  While their two teaching assignments and 1:1 programs do not look alike, these differences allow them to provide more varied examples for teachers to learn from.

I just picked up this book for my Kindle a few weeks ago and finally had a chance to start digging in.  I’m about a quarter of the way through it, so I’m certainly no expert.  But I work in a district about to embark on its 1:1 journey and thought it might be a helpful resource.  So far, I have quite pleased and plan to share many of the ideas in the book with the teachers I support.

The first thing I love most about the book is that it is written by teachers.  The book is accessible and because you know the authors are “in the trenches,” it gives them much more credibility.  They are also very honest with their experience.  They aren’t preaching for teachers to change their entire curriculum in the first year and they don’t claim it will be easy, but they do provide some valuable tips for teachers to make things easier that they themselves learned along the way.

I also appreciate the abundance of ideas for class activities and assessments they share throughout the book.  They provide a longer example to begin with, but then share snippets of additional assignments that teachers may choose to use instead.  This is particularly helpful for teachers who are new to integrating technology and helps to get their minds spinning about all of the possibilities.

One wish I would have for the book so far is that I would love to see more examples for younger grades.  Both Neebe and Roberts are secondary level teachers, come with a wealth of experience, and their ideas in many cases could still be modified for younger students.  Still, as someone who has spent the majority of their career in K-5 settings, I would appreciate more examples of ideas for successful 1:1 implementation with those students.

I’m excited to continue reading the book and look forward to sharing more learning!

Out With The Old…

Think about your favorite lesson to teach.  We’ve all got at least one; the one we look most forward to teaching every year and can’t wait to dust off.  When did you first start teaching that lesson?  Last year?  Five years ago?  More?

Does the lesson look the same now as when you started teaching it or have you made changes?  Most likely, the first time you taught it, there were some bugs.  Maybe a direction was unclear or there was a step missing that, once added, made the student’s work go much more smoothly.  The great part about accumulating experience is that we get the opportunity to revise our work and continually make it better.

Here’s the thing though.  If that favorite lesson is more than, say, five years old, there are so many things we’ve learned about learning and teaching that your lesson is most likely in need of a revamp (and very possible that it might even if it’s newer than that).  Much research has shown us that the way many of us were taught is actually relatively ineffective.  That’s not to say we didn’t have great teachers; in fact, it’s likely one of those great teachers who inspired you to pursue this career in the first place.  Even our best educators need to update their material once and awhile.

Think of it this way: how likely would you be to go to a doctor who hadn’t gone to a single medical conference or medical practice seminar in the past twenty years?  Would you want them using outdated medical tools, practices, and procedures on you or your loved one?  Of course not!  With medicine, we want the most up to date knowledge so we can care for our health effectively.

Education is very similar.  Though the stakes may not seem quite as high as in medicine, using practices that don’t support what we know about how students learn actually makes it that much more difficult for our students to learn.  We need to use what we’ve learned about education to make better choices.

Before you teach your next unit or lesson, consider the following images:

What do you notice?  What do they have in common?  All of them shift the focus from the teacher as knowledge bearer/giver and student as passive receiver to a model where the students are actively learning with the teacher as facilitator or guide.  You’ll also notice that there is an increase emphasis on personalizing learning for the student (and using technology to help with this as needed).  Kids don’t need the same things, so they don’t get the same things (I will grant that this gets a little stickier to understand when we have a push in education for “standardizing” everything – more on this in a later post).  In the 21st century classroom, the teacher’s role becomes more of a coach, guiding kids to the outcomes while pushing them to do the real “work” of learning.

I hear a lot of teachers argue that these ideas don’t match what was when they attended, and they’re right.  Schools in years past prepared students for jobs that already existed. But schools today must prepare students for jobs that can’t even be imagined yet. Kids today have unprecedented amount of knowledge at their fingertips within seconds. That changes the type of information they need to know going forward, and the type of skills they need to have to be successful after graduation.

This is a hard concept for some teachers to get behind. We are trained to be in charge of the classroom and make all of the decisions about student learning.  But don’t worry; giving students choices is not the same as letting them be in charge (My two-year-old gets to make choices, too, but he is certainly not in charge).  In fact, I would argue that allowing for student voice and choice actually requires better classroom management skills because those things can only happen within a strong classroom structure so students can feel safe and free to learn and explore.

Again, remember we are preparing students for life after our classroom.  Life is full of making choices.  If we want our students to make good ones in the real world, they need practice.  And what better place to practice making decisions that probably aren’t life altering than in the classroom with the support of a great teacher/coach?

These changes likely won’t happen overnight.  I don’t expect you to overhaul your entire curriculum over the weekend.  But as you sit down to plan your next week, consider the following and see where you can make a tweak or two:

  • Is there room in your lesson plan for a chance for students to make a choice or two?
  • How can you allow them to be creative, collaborative, critical thinkers with strong communication skills?
  • How can you provide differentiated learning for students of varying ability or readiness levels?
  • If your lesson includes lecture, how can you shorten, minimize, or toss it out altogether for something more engaging?

You just mind find your changes addicting.  I can guarantee your students will!


Google Drive: Collaborate or Copy?

Most people will admit that the introduction of Google Drive and its collaborative features, has been a game changer in the world of education.  Gone are (or should) be the days of emailing documents back and forth only to be working on outdated copies and trying to sort through multiple versions to find the “right” one.

The ability to share documents and other files with colleagues and students with just a few clicks is amazing.  We can work together on a single document in real time without having to crowd around a computer screen.  Participants can add to a meeting agenda without needing to email the items to the organizer.  Teachers don’t need to photocopy documents or manage hundreds of emails from students (particularly if they use Google Classroom).

Sometimes, however, collaboration on a document can be problematic.  Sometimes we want to share something with a colleague, but we still need to keep our original.  We remind them to make their own copy (which they can do), but they often forget and just start editing away.  This causes some teachers to revert back to old methods of emailing a document so they make sure their work doesn’t disappear.

But there is a little trick!  Did you know that you can force someone to make a copy of your document?  By making a small change to the URL of the document, the recipient will see a screen like this:Screen Shot 2016-03-16 at 10.26.20 AM

Clicking the “make a copy” button will automatically create a copy of the document in THEIR Google Drive.  Your document is intact and you’ve still shared your work with others.

How do you do it?  It’s actually pretty simple.

  1. Open a Google Doc (actually any Google file type should work).
  2. In the address bar, you should see a URL that begins with https://docs.google.com…
  3. Somewhere relatively near the end of the address, you should see the word edit (it may be followed by additional words or characters).
  4. Delete the word edit AND everything that follows it.
    Untitled drawing (2)
  5. At the end of the address, now add the word COPY.Untitled drawing (3)
  6. Highlight the entire address, and copy/paste it into an email that you send to anyone who needs the link.  When they click it, they will see the screen above.

So now you have the choice: collaborate or copy.  Both serve very useful functions in different situations.  For example, any time a group of teachers will need to have access to the SAME document, they will want to share the document with the group and edit on the same document.  Any time I’m sharing a document outside my organization, such as at conference or with Twitter friends, I tend to force the copy.  There are times, though, that I still use the force copy feature with colleagues within my district.

One example would be when you have created an assignment, assessment or template that you’d like to be able to share with your team.  In this case, if it’s important for every student to do the exact same assignment, you would want to share.  If you want each teacher to get the document but be able to customize it, you might want to choose force copy instead.

Again, both ways are helpful, so choose what works for you in your particular situation!

Google Expeditions!

Today, we hosted the Google Expeditions Pioneer Program at our middle school!  The program uses Google Cardboard, which is a viewer similar to the Viewmaster toys many of us had as kids.  Except this time, the view is in 3D and you can turn a full 360˚ and see everything around you.

The Expeditions program is still technically in beta form and they are “taking their show on the road” to let schools try out the app and get feedback.  They have an extensive and varied list of places and things to see around the world, including Mt. Everest, coral reefs, various cities around the world, and national parks and monuments.

While the scheduling process was a bit tricky, we were able to figure out a plan that allowed every 6th, 7th, and 8th grader at our school to take part in at least one Expedition.  8th grade world studies students learned about Syrian refugees and the Burj Khalifa in Dubai, 7th grade social studies students checked out the Statue of Liberty and Ellis Island, and world language students went on a tour of Barcelona and saw the Sagrada Familia in its yet unfinished state (complete with construction cranes).

The students were absolutely mesmerized!  Many of these students may never get to see these wonders of the world in real life, but the 3D viewing capability makes it feel like you’re really there.  Many of them asked if they could buy the Google Cardboard viewer for themselves.

My one frustration with the whole process is that our teachers didn’t have any idea what to expect from the program.  Though they were encouraged to choose an expedition that supplemented their curriculum, they didn’t get a chance to see what they’d actually be doing with their students until just before school started.  Once the program is widely available to teachers and schools, I can see how something like this could be incredibly valuable in the classroom.  Imagine learning about the Great Wall of China and then going to visit it in 3D in the next lesson!

What is amazing to me is that now geography doesn’t even hold these kids back.  If they want to see the Colosseum in Rome, all it takes is a few clicks of the mouse and they can be standing right outside.  While it’s definitely not as good as being there in person, it’s much better than looking at an Atlas or a photo in an encyclopedia like previous generations.  My hope is that seeing some of these sites will make these students want to travel the world themselves one day.  I know it’s definitely making me want to check my own passport!

All Learn and No Play?

Think about your school when you were a child.  Did you like going to school or dread it?  Do you remember being happy there or was it all hard work?  I honestly don’t remember much from those early school days, but I remember my mom telling me I was excited the first day and then came home and said I was bored.  That being said, I remember many good things about my elementary school days.  A few bad things, of course, but I was generally a good kid and did well in school so it was a pretty positive experience.

I remember having recess at least twice a day (and playing on playground equipment that would likely be banned today), having special events at school, and making all sorts of crafty things that I still have in scrapbooks in my basement.  As I’ve become a teacher myself, I wonder what that experience will look like when my own son gets to be school age.  Ask anyone who teaches kindergarten and they’ll tell you that kindergarten is not what it was when I went.

Kids are expected to be reading before leaving kindergarten, yet many of them enter it without knowing any letters or sounds.  It’s setting up a five year old with a pretty unrealistic expectation.  The learning that used to happen in first grade has now been bumped down to the younger ones, regardless of whether those learners are prepared for such a load.

Kids are coming to school younger and much less prepared than ever before.  Daycare is expensive and school is free.  Many families require both parents to work outside the home, and often multiple jobs, to make ends meet so there isn’t a parent home all the time to read to them.  Then on top of all that, we cut down on art, music, physical education, and recess and then expect them to sit still for eight hours.  Anyone else not surprised by the growing number of ADD/ADHD labels in schools today?

Today, I read an article from this past fall that talked about the vast differences between kindergarten in the United States and Finland (read the article here).  The Finns take a very different approach to learning with the little ones.  The vast majority of their day is spent at play and “real learning” happens when students are ready (though really, they’re learning all the time they’re playing, just not in the traditional sense).  In more and more American schools, however, children are expected to spend up to half of their day in reading instruction with minimal amounts of time for free play and physical movement.

A study from New Zealand cited in the article said that children who learn to read at age seven catch up to their peers who learn at age five, and by age eleven the two groups have comparable skills.  So why the big push to start so young?  Not only do our younger “readers” not come out ahead in the long run, I’d venture to guess that many of them actually come out behind.  If reading is drilled into you for 3 hours a day, will you ever learn to love it?  Will you ever think of school as a place to learn and grow or will it always be the land of rules, worksheets, and no fun?

I feel fortunate that so much of my own training has been centered around teaching children through play.  My approach to musical literacy has always relied on kindergarten to lay the foundation of sound and experience and never begins true “reading” until first grade.  My lessons centered around play and experience; often students wouldn’t see what we were doing as “work” or even learning because they were having so much fun (on a side note, I also had very few behavior issues in class because the students were playing and moving all the time).

According to the article, the Finns have a saying that goes, “Those things you learn without joy you will forget easily.”  Read that again.  Now think back to your own days at school, both as a student and as a teacher (if you are one).  How much of what you did was done with joy?  And how much do you remember?

I can already hear some of the teachers I know saying, “School isn’t supposed to be fun.  Kids are there to learn, not have fun.”  Why can’t it be both?  Is there some unwritten rule that says you can’t have fun while learning?  Or some thought that if your class is fun that the kids aren’t learning anything?

We need to let kids be little.  In case you don’t believe me, consider these:

“Play is the work of the child.” – Maria Montessori

“Play is the highest form of research.” – Albert Einstein

“We don’t stop playing because we grow old; we grow old because we stop playing.” – George Bernard Shaw

“Do not keep children to their studies by compulsion but by play.” – Plato

“Play is often talked about as if it were a relief from serious learning. But for children play is serious learning. Play is really the work of childhood.” –  Fred Rogers

They will learn, no matter when they begin.  But they can never go back to being little.

Google Classroom: Class Workflow Made Simple!

How many of these have ever applied to you as a teacher:

  • You have had to send students to the library to print an assignment they forgot.
  • Students left their papers at home.
  • Someone was absent and now needs to know what the assignment was or needs a copy of a handout.
  • Your shoulder is sore from hauling home a massive stack of papers to grade and comment on.
  • Your shoulder isn’t sore because you forgot all of the papers you needed to grade that night on your desk at school.
  • You’ve gotten several papers turned in with no names on them.
  • You have students share their finished Google documents with you only to get dozens of “shared with you” emails and then have to try to sort through all of them to put them in folders so you can find them later.

If any of these apply to you, you need to stop what you’re doing and get yourself on Google Classroom.  I’m not kidding; stop reading right now and go set it up.  I’ll wait until you get back.  It’s that awesome.

So now that you’ve set up your account, here are a few things you can do with Classroom to make your (and your students’) life easier.  First of all, it provides a place where you can post any class announcements, handouts, and assignments.  It’s a one-stop shop where students should be able to find any and all information they need to do their work.  No more “I can’t find my _______.”

Since it is a product within the GAFE domain, it works extremely well with Google Drive.  In fact, when you create assignments and have students submit them, Classroom will “talk” to your Drive account and automatically create a folder for each class and assignment, meaning you no longer have to deal with students sharing documents with you (and the dozens of emails that go with that) or trying to organize all of them in your Drive.

Evaluating student work becomes easier with Classroom as well.  Once assignments are submitted, the teacher can use the built-in commenting or suggesting features of Google Docs to leave feedback for students.  Tools like Doctopus and Goobric make rubric grading and other evaluation go much quicker (learn more here) and one like Kaizena allows you to leave voice feedback instead of writing or typing comments (check out Kaizena).

My absolute favorite feature of Google Classroom is that when you create an assignment and need to share a document with students, you have three options: students can view file (no editing privileges), students can edit file (everyone edits the same document), or make a copy for each student.  The last one is my personal favorite because if I attach a Google document or other file type, it will automatically generate a separate copy for every student AND put their name on it.  And again, because it’s Classroom, all of those files are neatly organized in the appropriate folder in your Google Drive with no additional work from you.  I suggest to teachers that they create a template for their students (even if the entire thing is blank) because then each assignment will come in with the same title and include the student name.

For those of you who teach more than one class at a time: when you post an assignment, you can assign it to any of your classes simply by checking a few boxes – no need to recreate the assignment for every section.  You can also add students easily by giving them the 6-digit alphanumeric code that Classroom generates for you; this is much more efficient than entering hundreds of students names yourself.  You can even add a co-teacher if you share your class with a colleague.  Finally, for all of my primary teacher friends out there, Classroom can even be used with your students!

If I haven’t yet convinced you of how awesome Google Classroom is, then feel free to check out some other resources.  There are several guides to Google Classroom for sale on Amazon, the most popular of which is Alice Keeler and Libbi Miller’s 50 Things You Can Do With Google Classroom (available here).  Keeler also has a tremendous amount of blog posts, suggestions, and tutorials on her website (www.alicekeeler.com).  I also wrote a short e-book that can help get you started with the basics of Classroom (free e-book here).

Ditch The Textbook! Find Your Passion!

This past week, I participated in the #ditchbook Twitter chat.  Named after the book by Matt Miller (see on Amazon here), the chat focused on moving students from being consumers to creators and pushing teachers to be creators themselves, particularly when it comes to their own curriculum and resources.  The teacher side of the discussion particularly challenges the traditional way of thinking of curriculum and resources in the classroom.

Many districts still spend time and money on traditional curriculum review cycles, which ultimately result in the purchase of some sort of textbook and related resources.  The thing is, though teachers spent a fair amount of time and district money to choose the textbook, they are almost always dissatisfied with their purchase.  But by then it’s too late; there’s not usually a return policy for a mass purchase of textbooks.

Then once the books arrive, teachers are always so excited because they think that this book might just be “the one;” the one-stop shop that allows them to just teach and not have to scramble putting together extra resources when the book doesn’t meet their students’ needs.  Yet time after time, they eventually come to the same realization that they will still be hunting and gathering to get the job done.

So why do we keep doing this?  If we have been buying textbooks for decades only to be continually disappointed, why haven’t we figured out that the only way to fix it is stop buying them? Even when some teachers are on board with not purchasing textbooks, districts often say no and force them to purchase them anyway.

One reason I hear from teachers who cling to textbooks is that it would take far too much time to curate or create all of the resources they’d need to teach their course.  A fair point to some extent. But if you’re already scrounging for extra resources to fill in the gaps of a textbook, why not just start there to begin with?  Start with the standards you are expected to teach and then select the best resources available to teach them.

Textbooks are boring.  When was the last time anyone was at all excited about the content in a textbook?  This is particularly true when I look at texts for English/Language Arts.  I have yet to see a textbook that can remotely compete with the excitement of a good novel or short story.  How on earth do we expect to create kids who are passionate about reading if all they ever get to read are the awful, canned stories from the textbooks?  Why not teach using the latest YA novel that kids are raving about anyway?

On top of that, textbooks in some subjects, such as science, are virtually out of date the moment they’re printed. And since many district don’t purchase new texts for at least seven years, there could potentially be drastic changes to the information before a new purchase is made.

Guess what else?  Teaching boring materials is boring.  Remember how most teachers got into education because they were excited and passionate about teaching kids?  It’s pretty hard to be passionate about textbooks.  Textbooks don’t make subject content come alive; passionate teachers do.  How much easier would it be to spring out of bed each morning if you knew you were teaching a concept you were absolutely nuts over using resources that were exciting and engaging?  Now compare that to your excitement about teaching chapter 5, page 12.

A word of caution here: teachers sometimes confuse teaching with passion with just teaching whatever they want and throwing standards out the window.  That doesn’t work either.  But good teachers can use something they’re excited about to teach virtually any concept by the connections they make with the material and the resources they support with learning.  In fact, they might even become more efficient because they will realize that they can tackle multiple standards with a particular resource.

One thing I haven’t mentioned yet is the fact that some teachers might feel compelled to use the resources provided by the district.  It’s as if the teachers need to hold up their end of the bargain in exchange for the district pulling out its wallet.  That needs to stop right now.  Yes, I know there are districts that mandate textbook use; some even go so far as to designate what is taught on a given day in each classroom with the excuse being high numbers of transient students.  I actually do see the benefit of some consistency in what standards are being taught when, but I believe it should be up to the teacher to determine how that happens.

Finally, what works with one group of students doesn’t work with all. And what is relevant one year might not be in five years. Creating or curating your own curriculum resources ensures that the person who knows the students best is choosing materials specific for them, rather than some generic textbook that is supposed to “fit” students all over the country.

This process I’m suggesting here is not an overnight fix.  Building these types of resource collection takes time and effort.  So start small.  Choose one standard or group of standards that is presented in a particularly terrible way in your current textbook and completely transform it.  How could you teach it so it would absolutely blow your students’ minds?  What resources would you choose?  Where could you allow students some choice in what or how they learn?  How will you have students show you what they know?  How might technology fit in?  I promise, if you take the time do really do this well, it will likely grow to be your favorite unit all year.  Imagine if you worked up to all of your units being taught that way – you’d have the best job ever!

Full disclosure, I haven’t even read Matt’s book yet and I know I’m totally on board.  In nine years of teaching, I never used the textbooks provided to me by the district (unless you count using one or two to prop up a projector or flatten something).  The material wasn’t great quality, the books themselves were not great quality, and the book didn’t support the sequence of concepts and skills set forth by our district.

If any of this resonates with you, join the #ditchbook Twitter chats on Thursday nights at 7pm CST and follow Matt Miller on Twitter!

Get Them Talking About Their Learning!

If you’ve spent any time with children, you know that the majority of them LOVE to talk.  In fact, as many parents and teachers can attest, once you get them started, it’s hard to get them to stop!  Teachers cite excessive talking as a problem issue for many students in class, but what if we could teach them to harness this power and use it for good rather than evil (well, not really evil, but certainly not productive)?

What if instead of giving a student a test at the end of a particular lesson or unit, you had them talk about what they know or what they learned?

Would you be able to say with certainty whether or not the child had mastered that standard?  I feel confident that if I got to hear my students talk through their learning, I could get a pretty good handle on what they know and where their learning gaps were.  On top of that, while reading and writing are extremely important skills for students to develop, the ideas of speaking and listening are too often neglected yet just as valuable.

But what about the fact that you have 20+ kids in your class?  Or multiple classes?  How can you get to every student?  You can’t always count on them to listen to each other, because it takes a fair amount of practice for students to evaluate each other well and give constructive feedback (though I would absolutely recommend this as a good practice to get into the habit of doing in your classroom).  So how can a teacher reasonably listen to that many students to ensure that he or she truly knows what their students know?  By using technology, of course!  Teachers can have students use a variety of tools to record themselves sharing their thoughts and listen to them later, freeing them up to work with other students or manage other tasks during the school day.

The easiest way to have kids create an audio or video recording with a mobile device.  My favorite is simply the video camera on an iPad.  They can record in “selfie mode” so you can see them as they talk or they could use the back camera to show something they worked on (paper/pencil, manipulatives, artistic creation, etc.) and explain what they did or learned.  Rather than spending time outside of class correcting papers, the teacher would watch the videos instead.

If you want to get a little bit more exciting, you can try out a few iOS apps like Chatterpix Kids, Tellagami, 30Hands, Educreations, and Book Creator.  Each of these apps works a little differently, but what they all have in common is they have an audio recording feature that lets students talk about what they’re learning.   And each app allows students to take or import a photo of something they have working on and would like to tell you about.  Not only that, but each of these apps is easy to use and content-agnostic, meaning you can use them with literally any subject area.  That’s particularly important because teachers get more bang for their buck when they can teach one app to do many things rather than many apps that each do one thing.

For the most part, each of these apps creates a video that can be exported to your device’s camera roll.  Once there, you can choose to view it from the camera roll or collect it elsewhere.  One tip though: if you have many students doing this type of project, it is helpful to have them include their name on the project somehow.  In Chatterpix, for example, I have my students put their name on the photo they record so I can easily see which student I’m listening to.

Once you have all of these great artifacts showing student learning, you can manage them using a great app like Seesaw.  At its most basic level, Seesaw is a digital portfolio where you and your students can collect all these great photos and videos, comment on them, or annotate them.  It can pull items directly from the camera roll or you can record right in the app itself!  And it’s so easy to use that even the youngest learners can use it independently with some pre-teaching.  The biggest benefit to Seesaw, though there are many, is that the photos and videos are already organized for you by student, which makes assessing and later sharing with parents much easier.  If you prefer not to use Seesaw, see my previous blog post about getting photos and videos from a iOS device to Google Drive for storage and viewing.

What should students record?  Anything and everything!  Use Educreations to work out a math problem and record themselves solving it and talking through their answer.  Snap a pic of a reading passage using Chatterpix and have them read it on video for a fluency check.  Show a diagram of the water cycle and create a Tellagami to explain how the process works.  Instead of doing a traditional report on an animal, state, or other common theme, create a slideshow in 30Hands and narrate the entire thing.  Create a story with Book Creator and narrate it, either in addition to or instead of writing the words – your choice based on the time and readiness of your students.

By the way, as I was searching for images to use with this post, I couldn’t find many pictures of kids talking in a school setting. It was almost always kids reading or watching the teacher talk.  I was able, however, to find several pictures of adults talking to each other.  What does that tell you?

iPad Full of Photos? Send Them to Google Drive!

Photos and videos can be a powerful tool for students and teachers.  But getting photos from place to place can be tricky.  It used to be the only way to move photos from your iPad to your computer was to email them a few at a time.  It took forever!  Not a good use of any teacher’s time!

Many teachers find themselves with very full iPads. Often, this is because they and their students are documenting their learning through photos.  Pretty soon, though, the iPad is full but we still want to keep those pictures.

Your iPad has limited storage, but your Google Drive does not.  You can now easily move photos from you iPad device to your Google Drive, where you can store as many photos as you need.  Once the photos are uploaded, you can delete them from your iPad and free up much needed space.

Teachers can opt to do this in one of two main ways: manually or automatically.  Now, you might be asking why I would even mention a manual option when it can be done automatically.  I like teachers to have options that meet the needs of their workflow.  If you have students taking photos, you may want to go through them before they end up in your Drive, so you’d rather upload photos as needed (Manual).  Or maybe you’d prefer an automatic solution and you’d like to go through the photos on your computer instead (Automatic).  No right or wrong answer here because both will accomplish what we need to do.

I have created directions for performing both options (click each option to see the directions I created for my teachers):

Manual Uploading

Automatic Uploading

Hope it’s helpful!  And keep taking photos!

Update: In the short few days since I created these tutorials, I’ve shared them with at least a half dozen teachers in my district! Apparently, I was more timely than I thought!

Voxer: Professional Development in Your Pocket!

Many educators out there have been touting the merits of social media sites like Facebook and Twitter for connecting with fellow educators for promoting ongoing learning and development.  I agree with them, and I’d like to add another app to the list: Voxer.  It’s a free website as well as an app for iOS and Android and it will literally change your professional life.

Voxer is essentially a walkie-talkie where you can either listen to people talk in real time or hear their recorded messages later.  Messages can be sent to individual people or multiple users can send messages back and forth in a group conversation.  The result?  You can listen to colleagues from around the globe asking questions, providing solutions, and offering support in real time.

I discovered Voxer a few months back after joining in on some Twitter chats with some fellow Minnesota educators.  I was added to the group and at first I wasn’t sure if I liked it.  Then I was added to another group that made me almost give up Voxer entirely – the group was huge and I couldn’t keep up with the messages!  But then I found the #TOSAchat group and it has been the best thing that has happened to me as an educator!

The group is active, but they make it okay to come and go as you please.  We use a hashtag system, which allows users to know the topic of the message so you can skip over it if it doesn’t apply to or interest you (this was me when some of them were talking about some standardized testing issues in California when I’m in Minnesota).

Just like Twitter, some people actively participate in the voice chats, while others prefer to listen and lurk.  You can record voice messages or you can write text messages.  You can like another person’s message and you can forward them to a variety of other apps to store them for later reference.

I take advantage of my commute time by listening to Voxer messages while I drive.  Time that would normally be “wasted” in the car is now time I use to enhance my practice and connect with other educators.  No other social media can do that!  Others listen during breaks during the day, others at night during Twitter chats.  Because you can listen to messages any time, you can hop in and out as you please.

Have a question? Throw out a message in the morning and you’ll likely have a response later that day.  Just need to vent?  Throw out an “edu-rant” and get support from like-minded colleagues.  Want to celebrate a major “edu-win?”  Share it with your pocket pals who will be more than happy to celebrate with you!

The friends I have made and connected with the past few months have literally changed my life.  Being the only TOSA in my district can be a lonely life sometimes, but I know I’m not on my own because I have an entire network of fellow coaches in my phone who support and challenge me to grow every single day.

Your first step is installing the app and creating an account.  Next, you need to find the right group.  I have seen lists floating around Twitter of all kinds of groups around a variety of topics.  Many times Twitter chats will also have a Voxer group on the side for continued discussion.  If you’re having a having trouble finding a group, reach out to me on Twitter (@halversonandrea) and I will try to help you find a group that meets your needs.

Give Screencasting a Try!

A lot of teachers ask me what my top tech tool is.  It’s like desert island for geeks: what one tool could you not live without if you were stranded with only one thing?  While it’s hard to narrow down, I think my answer right now would have to be the screencast.  They can be used by any teacher at any level and be extremely effective and efficient when done well.

What is a screencast?  Basically, it’s where you record what’s happening on your screen (a broadcast of your computer), usually with some sort of audio recording.  Some screencasting tools also allow you to record a web cam as well, meaning you can also see the person doing the recording while you watch.  Screencasts can be created on virtually any device, though some particular screen recorders work better on particular platforms.

Screencasts have a tremendous amount of value in the classroom!  A common use of screencasting is to operate in a flipped classroom model.  The teacher records a video segment teaching a lesson, the students watch the video as homework, then the teacher helps the students work through problems and questions the next day in class.  The lecture moves outside the school day and the in class time is spent working directly with students.

Screencasts can also be helpful when planning for a substitute.  I used to love creating screencasts for when I knew I was going to be gone.  When I was teaching a class, I couldn’t always count on getting a substitute who knew my content, but I always had someone that could click a link or press play.  I could leave directions for a particular activity or process, record a greeting for the class, or explain difficult concepts that my students needed to know about in my absence.

Or what about students who are absent?  How many times have you had to sit down with a student and reteach an entire lesson because they missed it?  Or a student who was in class but just hasn’t quite grasped the material yet.  Both of these students can stay in the classroom, watch the video on some kind of device, and then be ready to join back in with the rest of the class.  The teacher, meanwhile, is free to move around the room helping other students working in real time.

Students can also use screencasts to show what they know.  Want kids to explain a process and show you they understand?  Have them create a screencast where they walk through their knowledge, hopefully with visuals of some kind.  Want your students to do a slideshow of some kind but not want to sit through 30+ presentations?  Have them create a Google slideshow then record a screencast to talk through their presentation.  Then have students share their videos for the teacher and their classmates to view.

My favorite screencasting tool by far is Camtasia.  You can pause recording, edit out mistakes and add so many fancy features to make your videos look amazing.  But for the beginner screencaster, I would recommend checking out Screencast-o-Matic, Screencastify, or Snagit.  The last three products are free; Screencast-o-Matic works best on computers (Mac or PC) and the other two both work on the Chrome browser (Mac, PC, or Chromebooks).

Never made a screencast before?  One tip is to plan out your video ahead of time.  Have any windows open that you need and are ready to go rather than having to wait for software to load.  Make sure you have a quiet environment where you won’t be disturbed; this helps keep you from having to edit your video or re-record later.  Finally, keep your videos SHORT! Screencasts are generally more successful when they are less than five minutes, but even better when they are less than three.  Consider chunking your content into smaller bits to allow you to record shorter videos.  You will appreciate it when you are recording the videos (and so will your viewers).

Have you tried recording a screencast before?  How have you used it in your classroom?